This article was originally published in ‘Photographica World’ No. 118 of 2006 and is reproduced here by kind permission of the Author and The Photographic Collectors Club International Ltd.
Rescue and rehabilitation of a 1932 Rolleiflex Original
I suppose it is inevitable that, as collectors and users of vintage photographica, we are quite frequently confronted by a friend or relative who suddenly comes out with that heavily-loaded question, ‘You’re interested in old cameras, aren’t you?’ At first sight, a fairly innocuous question, but one which may carry overtones of ‘You’re an anorak, aren’t you?, and which invariably leaves one guessing as to what is likely to follow. Nine times out of ten, of course, the question is followed by the production of an ancient Brownie or some decrepit folder, and one is then left with the embarrassing situation in which the owner sees his or her camera as an incredibly valuable piece of photographic history, but you do not even want to give it house room. Occasionally, however, something more interesting materialises, either in the form of a piece of unusual equipment, or through a fascinating story or, sometimes, both.
In any event, this particular story began a year or so ago when I was having a beer with my brother, and he popped the already-quoted question. Well, of course he knew of my interest, and explained to me that his wife had been left a ‘very old Rolleiflex’ by her father, and would I be interested in seeing it? Next time we met, he produced a very sad-looking camera from an even sadder-looking leather case, and asked me if I could give him some information about the age of the camera, and explain its operation. Because my interests lie more in the realm of 35mm cameras, I told him that I could certainly confirm that this was a very early Rolleiflex, but that I would have to do a little research, and come back to him. Further, since I am also keen on restoration and repair, I asked him if he would like me to try to bring it back to an operational condition. My brother greeted this with a wry laugh, saying that this might be a little difficult, as the camera had spent at least twenty years of its life in a chimney! And this is where the story really starts...
History of Old Smokie
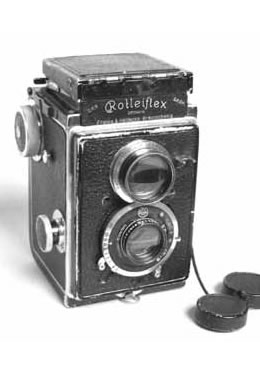
Back in the early 1930s, my sister in- law’s father – a Sudeten German – bought the camera (an f/3.8 Tessar Original Rolleiflex, serial number 104215) when he had qualified as a dentist. This was, of course, quite an expensive item at the time, but he clearly had a good eye for future prosperity, as he also got married and then, in 1936, set up his own dental practice. The practice was located in a small town in the Sudetenland (now, of course, part of the Czech Republic). The Rollei was used throughout this period, and right through to early May 1945, when the defeat of the Third Reich was very imminent. The local Czechs now began to expel the German population who had lived there for centuries; families were given no more than twenty-four hours notice to leave, only allowing them to take a maximum of five kilograms of personal belongings, but no valuables such as jewellery or cameras. Anyone found in possession of such items at the border checkpoint would be severely punished. Since the father believed, or hoped, that it might not be too long before they could return to their home, he decided to hide his Rolleiflex, along with a pair of binoculars, on a narrow ledge in the chimney of an adjacent boiler house which they had been using for general storage.
Later in May 1945, the family were evicted from their home, and subsequently settled in East Germany, not far from the border. However, travel between the German Democratic Republic and Czechoslovakia was forbidden for many years for the average citizen, and the family must have given up hope of recovering their treasured possessions. Indeed, it was almost a quarter of a century before such travel restrictions were eased, and it was not until the late 1960s that my sister-in-law’s parents were able to visit their former home town. Her mother spoke Czech, and by chance recognised an elderly lady (an ex-neighbour) who, after some persuasion, agreed to take them back into the boiler house. The father then, in some trepidation, climbed up onto the chimney, found the ledge and, after some fumbling around in the soot and darkness, located the camera case and grabbed it. But, as he lifted it out, he felt the binoculars tumble over the edge, disappearing for ever amidst piles of rubbish down below. At this crucial point, another neighbour had become suspicious of what was going on, and shouted that he was going to call the police. This was clearly the signal to hastily abandon the search and, still clutching the Rolleiflex, the father and mother left the scene, never to return.
And so, after all these many years stuck in an old – fortunately disused – boiler house chimney, the camera was finally rescued and, on her father’s death some twenty years ago, it passed to my sister-in-law. Perhaps not surprisingly, the Rollei was not used during this time, as it had certainly suffered from its twenty-five year incarceration in the chimney. The combined effect of moisture, soot, bird droppings, atmospheric changes and a generally hostile environment had resulted in almost total loss of the viewfinder image due to the breakdown of the surface silvering of the mirror; moisture had created a severe chemical reaction between the leather covering and the alloy die cast body, leaving great quantities of oxidisation powder. Similarly, most of the brass and nickel fittings were covered in thick green verdigris residue, and the hood would not open and close correctly. The leather case had suffered to an even greater extent, with much of the leather having rotted away completely. Despite all this, however, to my great surprise, the Compur shutter still ran from 1/25 to 1/300, and both the taking lens and the viewing optics were, after cleaning, clear and bright with no fungus, balsam separation or scratches. Although never designed to withstand such abuse, the condition of the Rollei is a great tribute to German engineering and optical quality of the time. So, what to do?
The Restoration
Accepting that there are widely differing views on restoration, my own inclination – with any camera – is to try to return it to proper optical and mechanical operation, but to keep cosmetic improvements to an absolute minimum. To me, the patination of a seventy-year-old camera, which has seen plenty of use, gives it a unique character, and prompts thoughts of the images, which must have passed through it over the decades. After consultation with the family, we agreed that I should restore the camera to working order, and only carry out essential cosmetic work, such as the cleaning of oxide contamination from the alloy body.
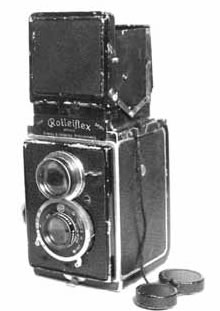
The main photo shows the camera before any work commenced, and perhaps this is a good point to mention that, with all my restoration projects, I spend plenty of time carefully examining the camera in an effort to identify any modifications which may have been made, or ‘rogue’ parts fitted. In this latter context, I noticed that the camera did not stand properly, due to the protuberance of the movable cover over a circular red film window on the base – surely not a piece of Rollei engineering? Other than this, everything appeared to be in original condition, so dismantling could commence. With most restoration jobs, I like to break the work into sub-assemblies so that I can complete work on each of these, and then simply re-assemble and re-adjust the camera.
Start the disassembly
I therefore started with the complete front panel which comprises the Compur shutter and taking lens, plus the viewing lens. It is a good idea at this point to set the focusing to infinity, and leave it there throughout the restoration. The reason for this becomes clear later. The three large black painted screws (at , 6, and o’clock to the shutter assembly) are removed, and the front panel carefully withdrawn.
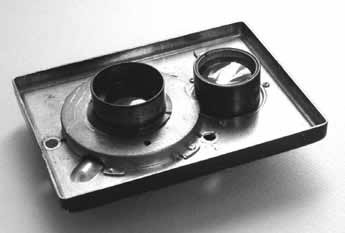
Looking at the rear of this pressedaluminium panel (Fig. 2), three tiny studs are visible on the edge of the screw holes – these locate into slots machined into the rotating studs on the camera body, which operate the focussing mechanism. Hence the need to keep the focus set at infinity until the front panel is refitted. We can now remove the viewing hood, by taking out the four small cheese-head screws – two on each side of the hood assembly, where it sits on the camera body.
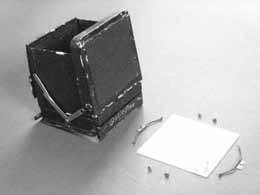
Following removal of the screws, the whole hood assembly can be lifted (with the front ‘Rolleiflex’ nameplate) up and off the body (Fig. 3). With my own camera, I also removed the strap lugs and brass guides, as well as the wind knob/ assembly and the rear door, although I only did this because it simplified the removal of the leather body covering (where it had not already come away) to facilitate the cleaning off of the severe oxide residue present on all the aluminium surfaces.
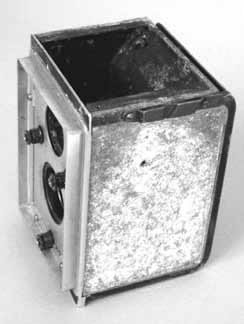
With the leather off, the oxide was scraped off mechanically until I was back to bare metal (Figure 4); I also spent time cleaning the inner surfaces of the leather panels, prior to re-gluing them back in place with shellac, which was the original adhesive. The nickel parts – focus and wind knobs, strap lugs, frame counter disc, etc – were cleaned with Silvo metal polish, and perhaps surprisingly came back to bright, almost new condition. I could now turn my attention to the first of the sub-assemblies, the lens and shutter assembly. This is quite easily removed from the alloy front panel by unscrewing the slotted tube located on the rear of the shutter – the complete shutter and lens now drops out from the front.
Since I wanted to thoroughly clean all the glass surfaces of the Tessar, I unscrewed the front element and rear component (which in turn can be further dismantled into two parts) and, using a proprietary lens cleaner, removed years of oil contamination and dust. The result was, amazingly, crystal-like! As mentioned, the slow speeds were in need of attention, and reference to the well-thumbed pages (29-31) of Dave Todd’s super article in PW80 (March 1997), enabled me to dismantle the shutter so that the slow speed escapement and all other moving parts could be thoroughly cleaned with lighter fuel. Tiny quantities of Microgliss MD 547 oil on each of the pivots restored the mechanism to running order.
Viewing Lens
Next, I turned my attention to the viewing lens, which is removed by first unscrewing a tiny grub screw on the top edge of the milled ring, and then the whole unit may be unscrewed. Clearly, the removal of this item requires one to re-set the focus when the camera is re-assembled, so, if the lens is clear, it is best left in situ. The front panel can now receive its cleaned shutter and taking lens, together with the viewing lens, and be put to one side.
Focusing Hood
At this point I turned my attention to the very poor condition of the focussing hood. From discussions with members who ‘know about Rolleis’, I knew that the hood is one of the weak links with the Original Rolleiflex, and there is no doubt that it suffers after much use. In this case, it would not open or close properly, due to the fact that the hinged lid was quite badly distorted, and the hinges on the side and rear flaps were partially seized due to some corrosion; these flaps are all operated by very fine springs wound round the hinge pivot. However, the first job was to remove the ground glass screen (with its fixed spirit level), and this is done by removing the two spring clips which are visible below the screen itself. I now very carefully straightened out all the flaps and the top hood and – since I did not want to have to dismantle the hinges on the flaps (very tricky job to get them back in place!), I cleaned them and gave them plenty of lubricant to free them up. Fortunately, it worked, and a small adjustment to the release catch at the rear of the hood had it working properly again. The ground glass screen was cleaned, and
Silvered Mirror
I then started a rather protracted search for a solution to the defunct surface- silvered mirror. A quotation for re-silvering at £40 drew a sharp intake of breath, and I was offered another part-dismantled Rollei for the same money. However, I felt that almost any twin lens reflex mirror would probably do the job, and at a recent Wolverhampton camera fair, John Vincent kindly obliged for the princely sum of just £3! A little grinding ensured a perfect fit, and, since it was fractionally thicker than the original, the focus of the viewing lens was adjusted accordingly. (Since then, of course, Derek Ashworth has pointed us in the direction of a firm who can re-surface silver the viewing mirror for a modest £ 2.50, as described in his article on the Voigtländer Superb in PW 4, page 26).
Winding Knob and Counter Ring
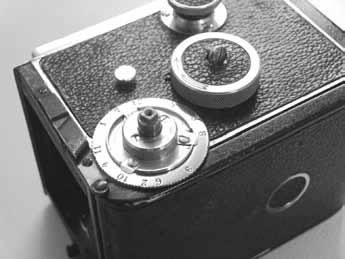
The only other item which appeared to need attention was the winding knob and its associated counter ring, the latter having seized solid. Removing the central screw from the wind knob allows access to this ring (Fig. 5), which I found had simply reacted with the leather underneath so that the corrosion was acting as a glue-like substance. Removal of this verdigris from both components allowed the counter ring to move again, so that it can be reset when loading a fresh film. The sub-assemblies were now refitted, and the camera is once again back together and in full working order. The illustrations show the Rolleiflex before, during and after (Fig. 6 and 7) restoration, from which it will be apparent that cosmetic work was deliberately restricted to the re-fixing of leatherwork, and general cleaning of the nickel parts; the only areas where I felt some retouching of missing paint was called for were those tiny parts which looked wrong as bright, bare metal. Finally, my good friend Ron Holloway let me have a really lovely, original early Rolleiflex case, so it should now be very adequately protected for the next seventy-five years of its life – although I must hope that it will not again have to endure twenty-five of these in damp, dirt and darkness!

