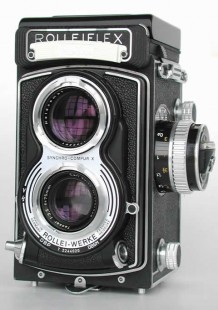
I have had a Rolleiflex SL66 for a number of years. I bought it through an advert in Amateur Photographer. I went to Abingdon (1½ hours drive) to inspect it before handing over my ‘readies’. The vendor was selling this mint, boxed camera because he was ‘upgrading’ to a Rolleiflex 6006. I’m glad he did! Over the years I have built up a collection of almost all of the accessories available, including the Aquamarin underwater housing. It is a lovely camera which I enjoy using. The only problem was with sticky shutter curtains, which was noticeable when the camera was cold or had not been used for a few weeks. This was fixed by Brian Mickelboro, who said that the rubberised curtains had become sticky and so ran together, not opening. He cleaned them up and said that if the problem persisted, a new shutter would be required. Thankfully, that is not the case.
I had always hankered after a Rolleiflex SL66SE and have watched them come and go on Ebay and always resisted the temptation. Inevitably, there comes a time when one’s will power gives way – I now have one! It is in excellent condition; almost like new. I did not use it immediately because it is almost too good to use except on ‘special’ occasions.
Prior to going up to Whitby, I had the terrible task of trying to decide which of my collection of cameras to take – they had to be Rolleis, so that narrowed it down a bit! David Morgan had found some Kodachrome 64 in his local Boots the Chemists and as these had to be processed by November this year, my 3003 was on the list. In the end, I decided to exercise the SL66SE as my roll film camera. I used the 3003 ‘around town’ because even with a few lenses, it is more manageable that an SL66SE. I’m glad, that when I walked up the 199 steps to the Abbey ruins, that I did not have the 'SE' as added payload!
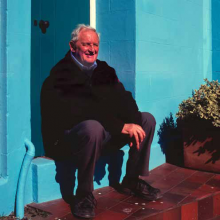
The trip on the railway seemed the ideal time to take this heavy camera; the train could do most of the hard work. Whilst at Grosmont, there were a few photo opportunities but the ‘touristification’ of the village was a disappointment. Then on to Staithes in the afternoon, where we were rewarded by numerous subjects. Whilst on our final leg before climbing the hill back to the bus stop, I had two frames left. On crossing the little pedestrian bridge, there was an elderly gentleman, sitting on his doorstep enjoying the last of the sun before it dropped below the hill. A perfect subject and with his permission, I took one photograph leaving ‘one in the pot for emergencies’. Whilst talking to him, it turned out that he was now the oldest ‘native’ in this village with a population of about 1100. I thought I would send him a print when I had had the film processed.
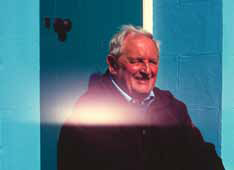
The SL66SE and the Light Leak effect
Having ‘wandered’ up the hill, the Roman Catholic church - Our Lady Star Of The Sea - set against the deep blue sky was the subject for my last frame. On returning home, the two rolls of Fujichrome Provia 400 film were duly sent off to Peak Imaging for processing. On their return, I eagerly held the sleeves up to the light; what a disappointment, many of them - from both rolls - had been fogged with a streak across the middle of the frame. My photograph of the elderly gentleman was the worst, with the fogging right across his face. I was not happy!
I set about trying to find the source of the light ingress. I had a close look at the magazine but could not see any obvious source. A logical place would be the magazine slide gate but this would only effect the bottom edge of the frame (at the top of the camera because the image is inverted). This was not the case. I used the backing paper from an old roll of film. I put it through the camera, stopping at each frame number to remove the magazine, draw around the inside of the magazine gate opening, putting the magazine back onto the camera to wind on and so to repeat until the end of the roll. I then transposed the fogging shape and position from the transparencies onto the respective frame marks on the backing paper. The backing paper was then loaded into the film carrier again and wound on until the first frame markings were centered on the pressure plate. I then worked my way through each frame until the first fogging mark appeared.
It had to either be across the middle of the frame when the exposure was made, ie reflecting from something in the camera body or when the frame was waiting, still partly on the spool to be wound into to the film gate before exposure or after exposure, not fully wound onto the take-up spool. Studying the position, it could not be before exposure, the frame was still fully on the feeder roll; during exposure was unlikely because it did not affect every frame. After exposure, the frame was only half wound onto the take-up spool and the centre of the frame was just under the door-close light-trap. Just inside there is a bright chrome catch. It looked as if this was where the fogging was coming from.
On the SL66 magazines, there is a black bar – part of the film feeler mechanism – which covers the bright catch bar. I fitted a black plastic shield over this bar. I could not really see how light was getting in because all the light trapping was in good order and the tongues and grooves appeared to be deep enough and overlap sufficiently. I put another roll through the camera – 400ASA this time so it would show up more than with the 100ASA of the first films. The same fogging but not so marked this time. I spoke to Brian Mickelboro who said that it was unlikely to be the magazine but that on the SL66SE, there is a cover for the meter cell which may cause light to reflect on to the film during exposure.

The problem with the magazine
On checking the camera again, nothing like that seemed to be happening. So to prove whether it was the camera or the magazine, I put the 66SE magazine on my SL66 body and a SL66 magazine on the 66SE body. It was definitely the magazine. I studied the magazine door closure, I could not see how light could be getting in. All seemed to be fine. I thought that possibly the foam seals might not be quite thick enough… I cut some foam from a block and fitted that instead of the original seals. I also added a strip of black flock Fablon sticky plastic to the top of the magazine body where the door closes onto.
I ran another film through; all sorted! I guess that if the camera was used in a studio with electronic flash, this would not have been noticed. Having used the camera in bright sunlight, the problem had shown itself. I then realised that the fogging was worse where I had taken longer between one exposure and the next. Exposures taken within a minute or two of each other did not show the effect; 10 to 20 minutes was definitely too long. I hope that if you have a similar problem with a second hand camera, that you can be persistent and cure the problem with sticky black ‘furry’ Fablon.
Older cameras from the 60s and 70s had foam seals which can go sticky and break down. This is a good bargaining point to reduce the purchase price - it is easy to clean off the old foam with a bit of white spirit on a cotton bud and fit new seals. Then you have a good usable camera. Anyway, having been disappointed with the fogged portrait transparencies that I had hoped to send to the subjects, I put them to one side. Whilst scanning photographs for this issue, I scanned the transparency of the train driver and removed the flare in the image using Photoshop - I wanted to send a copy to the driver, just to say thanks for posing and I was pleased that this one had turned out alright. I then decided that I had nothing to lose but some 'spare' time, so I had a go at repairing 'the old man of Staithes'.
Well, I think it has turned out quite well, although a little more work is required under his chin - trying to retain the correct colours and also the detail. Had his coat not been very dark, I would not have been able to repair the damage whilst still retaining details of the folds in the fabric. I was lucky with that area. I created seven layers, each working on small areas of the background and details of the gentleman's face and clothing; each layer altering the hues, saturation, exposure and contrast of specific areas. These were then blended at various levels of transparency with certain areas being deleted on the appropriate layers to create the final image which was then 'flattened' into one layer for printing. It is good practice to save the file before flattening, just in case further adjustments are considered necessary...