I have recently acquired a couple of these magnificent cameras at the knockdown prices of £375 and £306. I sold the trigger winders and one of the 40mm lenses, as they were not needed. I also managed to get hold of a 80mm f2.8 Planar. In the end, having sold my Voigtländer and some lenses, I actually made £25 profit. Makes a change!
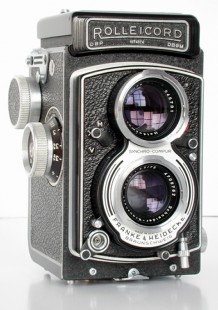
These cameras were not a commercial success; I can only make a guess why. In my opinion the camera was too expensive. Rollei is a very prestigious name and the camera at £1,400 (€1800 in Germany) was only half the price of the Leica BUT it was double the price of the Voigtländer, which is also a prestigious name. If you hold the Voigtländer R2 and Rollei 35RF side by side they are identical in every respect, except for the colour, body covering and, of course, the name. Internally things are different, the body of the camera is made of die-cast aluminium and the shell of magnesium alloy (top, back and underneath). This is backed up by the fact that the Rollei 35RF is heavier by about 30g.
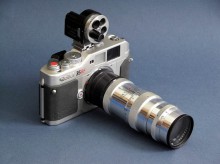
The other reason why I think it failed was the choice of lenses: 40mm, 50mm and 80mm. The 50mm f1.8 never materialised and the 40mm and 80mm lenses do not really correspond to cameras/lenses from Leica, Voigtländer and Zeiss. The exception is the 40mm, as the Leica CL, Minolta CLE and the new Bessa R3a use 40mm lenses, but the choice is very restricted. In any case, the 35RF was discontinued before the Bessa R3a was introduced. 50mm lenses are no problem as there are plenty of them, from the Russian Jupiter 8 to the f1 Noctilux from Leitz; it depends on how much you want to pay! Now, the 80mm Planar is an odd lens as nobody else produces this focal length for a R/F camera. Leitz & Voigtländer make a 75mm and 90mm, whilst Zeiss and the Russians produce an 85mm. I have an 85mm Jupiter 9 and the difference in the field of view, compared with the 80mm, is so little that I would be hard pushed to tell them apart. The Jupiter is worth about £50, whilst the Zeiss 85mm can be got for £1,600!
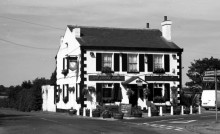
80mm Schneider - f4 Companon-S (Enlarging lens)
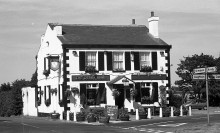
85mm f2 Jupiter 9
90mm f4 Makro Apo-Symmar adapted for 35mm SLR
The three pictures shown here show the field of view for the 80mm, 85mm and 90mm. The 90mm used was a Makro Apo-Symmar with an adapter for a 35mm Rollei SL35. It is a tighter crop than the 85mm but a Leitz or Voigtländer 90mm can be used on the Rollei – just think inside the 80mm frame. If you do have one it would be worthwhile experimenting to see the difference, as the exact focal length varies from sample to sample and, subsequently, the field of view. The theoretical focal length of the Apo-Symmar is 91.3mm plus, of course, percentage variation. The Zeiss offering, I am told, is hand made with each mount being individually made to suit the exact focal lengths. In these days of computerisation this probably is not as complex as it would first appear.
Also, I have included photographs taken with 35mm, 40mm and 50mm. Even if you don’t have the correct viewfinder with a bit of experience the nearest will suffice.
So, in my opinion, that is possibly why the 35RF failed. Why 40mm and 80mm? Both these lenses already existed. The 40mm Sonnar is included in the very successful Rollei 35 series. The 80mm is the lens head used in the current TLR camera. All they had to do was make mounts for 35mm R/F cameras.
The camera itself is a joy to use, giving well-exposed slides with the 40mm and 80mm lenses. Now a word of caution: if you use lenses wider than 40mm then do tests. I found that my Zeiss 21mm underexposes. I assume that my camera is fooled by the greater expanse of sky. A Gossen Vario-six F on a light box with slides showed a 1-stop difference between the correctly exposed version (of the same subject) and the 21mm. Notes made while doing test in the field showed this to be so. Subjects with no sky are ok. I have recently used Ilford Delta 100 in this camera and found the images to be incredibly sharp, giving results approaching the quality associated with 645. The Russian 135mm is the poor relation but it is older technology. Whether one wants to pay the high price of a Leitz 135mm f3.4 Apo-Telyt is something only you can decide.
50mm f2 Jupiter 8
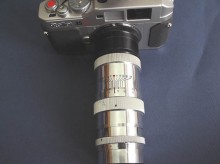
40mm f2.8 Rollei Sonnar HFT
35mm f2.8 Jupiter 12
Now, some people might regard the 35RF as too restricting, you can’t do close-ups or use a lens longer then 80mm. Well you can! You can use a 135mm lens. The long side of a 90mm frame is equal to the short side of a 135mm frame. A Russian turret finder has a 135mm finder and can be adjusted for parallax. Some are incorrectly adjusted. They can be adjusted to give the correct field of view if you know what you are doing. This finder has vertical and horizontal lines that cross in the centre and place that in the middle of the R/F patch, focus, then take your picture! I have used this many times and found it to work well. Some say the R/F base-length is too short but I have no problem. There are several lenses available as follows:
Not to mention 42 different 135mm lenses made for Leica fit cameras.
The Russian lenses offer best value at £20-30 and are quite common. They are a copy of the 85mm f2 and 135mm f4 Sonnars, except that it is in Leica mount and not Contax. I paid £18 on eBay for my 135mm. I found that the lens was not in focus due to poor quality control (do check Russian lenses). The lens head screws out and shims are to be found inside – don’t lose any! In the sample I have the R/F coupling was not right but adjusting this so that it read right resulted in the lens being even further out of focus! I needed to make shims to a thickness of 0.66mm; I used thin card and paper. I placed the camera on a tripod, opened the shutter on ‘B’ and used a screen with a split image R/F in the middle. The lens was found to be correct on its closest distance (2.5m) and infinity; it now yields excellent results.
Top view of 135mm lens, note the index mark for the correct, predetermined point of focus
Now close-ups. This can really only be done with tele screw lenses. The 80mm Planar is screw with an adapter. Place the camera on a tripod with no lens on. Move the camera towards (or away from) the subject, so that the R/F shows the images to coincide. Place a 5mm Leica extension ring between the lens and the bayonet adapter. Open the shutter on ‘B’ and, using a ground glass screen, focus the lens. Take note of the exact setting. From then on all you have to do is set the camera up as described, rotate the focusing ring to the predetermined point and take the picture. The 80mm frame is parallax compensated, and I have used this method. On my 85mm Jupiter 9 the exact point of focus is halfway between 1.3m and 1.4m. This will vary, depending upon the thickness of the tube and exact focal length. With a 135mm, you need the same 5mm tube and a 25.5mm tube; the same set up should be used. In my case the exact point of focus is a third of the way between 4m and 5m. Again, the Russian turret finder can be used and turned until the centre of the finder coincides with the centre of the R/F patch; mark the scale so you can use the same position in the future. I have used this technique and had excellent results. You could use a close-up lens but the disadvantage is that that you would have to remove the lens to find the correct position and framing; when you put the lens back on your framing is incorrect and you may forget to remove the c/u lens and take ordinary shots!