By Manfred Borgis, Berlin - Translated by Wolfram Borgis, Australia
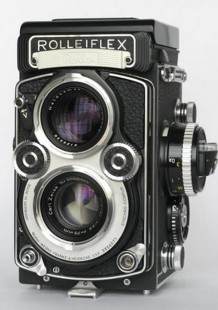
I am an owner and user of the Rolleiflex 3003; so when I was looking for a camera to take the superslides, I remembered the 4x4cm TLR Baby Rolleiflex, once also produced by Rollei.
Now as ever, I have a high regard for their sharpness and brilliance which amazes me again and again.
At the time I acquired this camera secondhand, there was only one black and white film available in size 127, the R100 from Efke, an old Adox emulsion from a Croation production.
I found help with this dilemma, from a private person who offered a cutting device with which one can cut a 127 film from a 120 roll film. With this implement in the dark, a 120 roll film is guided across a stage, equipped with a knife blade. The now smaller filmstrip is simultaneously wound onto an empty spool, which I keep from the Efke r100.
In this way, at the moment, I cut Velvia 50 to size. This film has over the top colours for my liking when used for my 35mm slides but when used in the Baby Rollei, delivers sharp and colour neutral slides. The reason may be that the old lens system did not have as extensive coatings as the newer optics.
By now Efke also offers a colour reversal film in 127, which I tried and was not satisfied with. Therefore I will continue to enrich my slide shows with 4x4 images, produced in the described manner.
- Black & White film: Efke R100 (good results)
- Colour Reversal Film: Efke UCR Chrome 100
Supplier: Fotoimpex
Alte Schönhauserstrasse 32b-c
10119 Berlin | Germany
Telefon: +49 (0)30/28599081 | Freecall: 0800 IMPEXDE
Telefax: +49 (0)30/28599475
info@fotoimpex.de
www.fotoimpex.de
They also stock Adox Adocolour 126 and Solaris 110 cartridges and 2.25” x 3.25” Classic Pan ISO 200 sheet film for Rollei plate/sheet film backs.
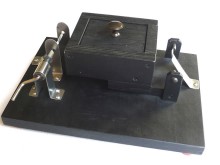
Operating instructions for the Franz Reicheneder film slicer (pictured)
The No. 120 rollfilm can be inserted into the device with the light on. Before commencing the cutting procedure, the light must be switched off.
The cutting procedure must be carried out in a darkroom. After cutting is completed, the film can be removed again with the light on.
Before inserting the No. 120 rollfilm, cut off aproximately 10 centimetres of the paper leader. Then cut off a paper strip on the right side of the film leader, 1,5 centimetres by 10 centimetres. That leaves the paper leader on the film about 4,5 centimetres wide. Now cut the leader to a taper, leaving the end like a triangular point.
The rollfilm can now be installed into the device, inserting the pointed papertip into the empty spool of the No. 127 film. Switch off the light.
The 120 rollfilm is now being transported over a platform with a cutting edge by means of the crank handle. Whilst rotating the handle, the film is transported and cut to fit the width of the No. 127 rollfilm. At the same time it is wound onto the No. 127 spool.
Upon completion, the light can be switched on again. Now cut off 10 centimetres from the trailing backing paper and approx. 15 centimetres from the film emulsion, attach the film end to the backing paper with adhesive tape. Roll up the backing paper leader on to spool and cut the paper tapered again. You are now finished.
Time consumption about 5 minutes. By the way, after cutting off 15 centimetres of film, 13 exposures are left on the roll.
Unfortunately the film cutting device is no longer available, so I did some searching on the internet for film slicers/slitters and there was a site (no longer) where ‘Vincent’ made some slitters from old cameras. He has fitted a block, with two razor blades attached, into the back of an old 120 rollfilm camera. By inserting the roll of film and winding it through, the film has been cut to size in the dark. using the method described above to get the correct length. JW
Vincents' Method
This slitter cuts down a roll of 120 film for use in cameras using the old 127 film size.
I can actually get 12 shots instead of the usual 10, if the camera has enough space to fit the resulting fatter roll. (Probably 4x5 cms negative size)
I used an old Kodak Bownie camera (1). It’s really designed for 620 film, but with a few modifications, you can fit a 120 film roll into it. (I can still use it as a camera if I take out the blades.) Here’s a rear view (2). Notice the matte board pads that the knives press into. These pads are light sealed onto the camera with big gobs of RTV silicone.
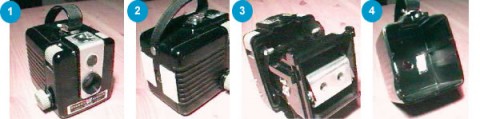
Vincent's method for resizing film
Two razor blades are bolted to an aluminum block (3), machined to the correct width. The block itself is then bolted onto a cross member, which is bolted to the side of the camera. (the two shiny bolt heads are visible). Two square holes are cut into the back (4), for pads which are used to hold the knives steady. (I used regular razor blades, which can wiggle from side to side while cutting if not held).
The 127 film width is actually narrower than the paper backing. However, as the film must eventually fit into my developing tank reel, I cut both the film and paper, at the same time, to the film width (about 1.8”). This results in the film roll being narrower than the film reel, allowing fogging along the edges. A little care in loading, and keeping the film in the dark until use helps to minimise the amount of fogging.”