Ten years ago or so, when I had my darkroom set up, I used to enjoy “playing about”. Unfortunately, now I have neither the time nor the space required, although I still have all the equipment. I learnt my lesson when, being considerably (?) younger, I sold my Rolleicord Vb and all my darkroom equipment because I thought I had lost interest in photography. A few years later I found my enthusiasm again and had to re-equip from scratch (silly billy!).
So now all my kit will stay, just in case….! To get “back on track”, in those days I experimented with the zone system, pushing and pulling, exposure index (EI) and all sorts of technical stuff. I do not consider myself to be skilled, but I do enjoy trying to improve on what I have produced; possibly more so now than before. I was happy dodging and burning and experimenting with split grades on multigrade paper; all in the interests of getting the maximum detail out of a black and white negative. Colour printing is a different story, especially as far as dodging and burning is concerned!
The “Digital Darkroom” has some advantages and some disadvantages, over the chemical one. The digital variety takes less room, is clean, is not so anti-social, gives one the opportunity to make small changes, review progress, make further adjustments, save unfinished work and comeback to it on a future occasion. Getting rid of dust spots and redeye is easy too. Unfortunately you do not have the fine control over tone and contrast that is available under an enlarger.
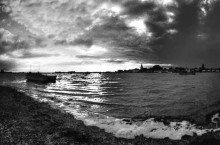
Bosham Creek - Black and White image over exposed scan
Recently, I wanted to produce some framed black and white enlarged prints. I thought that a rummage though my negative files would produce suitable material which I could scan to file and then send off to be commercially printed. A look at some of the suitable negatives showed good highlight and shadow details and I knew they had produced good prints when I had previously enlarged them in the darkroom. So, into the scanner for a preview, adjust exposure and contrast and then scan. Where was all the highlight and shadow detail? I had never really noticed this problem when scanning colour images, probably because they do not have such a brightness range to start with and I have always been concerned with colour casts.
Black and white scanning is obviously a different matter. See here for further detailed explanation. I have Photoshop CS2 which has a ‘merge to HDR’ (High Dynamic Range) processing facility. This is designed for use with digital camera “Raw” images. Because digital sensors have a limited sensitivity range, in a high contrast scene, the image will have burned-out highlights and blocked-up shadows. To overcome this, it is possible to set the camera up on a tripod and take a number of photographs at different exposures, e.g. say -2 stops, -l stop, correct, +1 stop, +2 stops. This should expose for detail in the darkest shadow and brightest highlight across the sequence. These images can then be combined in Photoshop which processes the batch to give a 32 bit image file (lots more image information than the usual 8 bit files) with a High Dynamic Range. This wide dynamic range can then be adjusted and “compressed” to display satisfactorily on a computer screen or be printed out.

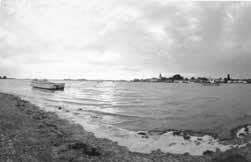
Bosham Creek - Black and White image under exposed scan
I had never thought much about this option in Photoshop (not being a digi-fan), other than thinking it might be possible to scan-in multiple exposures from one negative and combine them in the same way. By way of a timely coincidence, there was an article in Amateur Photographer, a few weeks ago, about a program called Photomatix Pro from www.hdrsoft.com. This is similar to the HDR processing in Photoshop but is easier to use. A trial version was available – so I downloaded the program and gave it a whirl. I scanned in one of my negatives at five differing exposures, imported them into Photomatix and let it do its stuff. Two or three differing exposures are adequate though. The resulting image still requires some corrective adjustment work in Photoshop but there is detail to work with.
Previously, with a single scan, I had found that if an area is too dark, by locally lightening it, it becomes a murky grey because all the shadows have “blocked-up”. There was no detail scanned into these areas in the first place, so large areas of black just became grey. Conversely, the highlights having no detail either (having burnt-out), and go a murky grey too when darkened. With the HDR images, virtually all pixels have tonal information, which then can be lightened or darkened whilst still holding detail.