For a few years now, I have been taken with the idea of panoramic photos – like those from a Hasselblad Xpan producing a 24x 65mm panorama. In Issue 5, in collaboration with Michael Craven, we looked at the sub-format adapters available for the Rolleiflex T, Rolleimagic and Rolleicord Va and Vb cameras and with particular relevance here to the 24-on adapter for the Rolleicord Va and Vb giving a 24x54mm image.
I have periodically tracked Xpans on Ebay but have found that they go way over my ‘justifiable limit’ for a specialist camera that I would seldom use (similarly with my tracking of Hasselblad SWC cameras). So, having previously pondered the idea of converting a Rolleikin adapter and given that idea a ‘not practical’ tag, I spotted a 35mm adapter for a 120 Holga camera on Ebay for about £20. My thoughts again turned to being able to use 35mm film in one of my Rolleiflexes so I could take 24x54mm frames that would not involve any major outlay.

Bring your own foam
Recently, finding myself with a quiet (!) moment, I searched the Internet for appropriate clues...
If this article seems to ‘flit-about’, it echoes the way my thought processes searched for the best way of achieving my aim whilst considering readily available resources!
There is quite a bit of information in the public domain and I cannot claim to having done anything original in my design.
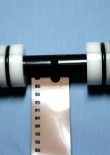
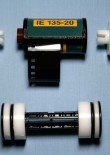
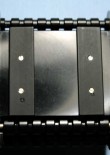
I found solutions as unsophisticated as a 35mm cassette being firmly wedged in the spool recess with foam and the film running directly onto a take-up spool narrowed down with elastic bands right through to the use of accurately machined spacers and parts. (see photo left and the original site here)
Having a lathe and milling machine, I opted for the more precise machined option, which I considered would not take much longer than rummaging about for suitable donor parts.
The Options
Firstly, the options to be considered for holding the film are:
- from 35mm cassette to 120 spool
- from 35mm cassette to 35mm spool (centre of cassette)
- from 35mm cassette to 35mm cassette
- from 35mm spool to 35mm spool
Option 3 has the advantage in that, at the end of the film the emulsion does not have to be rewound but can just be sliced from the feeder cassette.
Option 4 would suit using bulk film and then loading it straight into a developing tank once exposed.
When using a 35mm cassette/spool, the gap between the cassette and the sides of the camera spool-well has to be bridged and on the take-up side, the rotational drive has to be connected too.
If using a 120 spool as the take-up reel, the width of the centre section has to be reduced to keep the 35mm film centralised as it is wound on.
There is no way of rewinding the film into the cassette within the camera after the last exposure (unless you use a Rolleikin – see next page) so the camera or film back must be unloaded in the darkroom or a changing bag and then the film can be rewound. If you process the film yourself, it can be loaded straight into the developing tank at this stage.
When looking at the pros and cons of which camera would be most suitable, I felt that flipping the camera on its side to change from portrait to landscape format was very important. The SL66 is almost square in cross section and fits in the hand comfortably either the right way up or on its side. With a prism attached, it becomes more bulky but viewing and framing is easy. Another consideration was the dual 120/220 capability of the original SL66 magazines (this is not available on the later ‘E’ magazines).
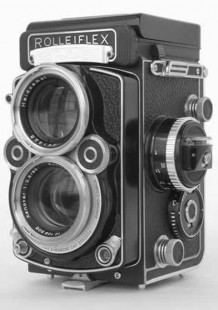
Rolleikin fitted to 2.8E2 without film gate, showing how 35mm film has a tendency to curl towards the lens. If this was to be considered, a rigid packer could be inserted into the film gate each side to support the film edges
TLR Test Case
Mentally flicking back to the TLR idea once more, I thought of just using the spool holders from a Rolleikin without the film gate fitted as being a possibility. A quick trial in my Rolleiflex 2.8E2 showed that it would work but that the film wind crank did not stop when the next frame was in position, so it was important to carefully wind the film crank forward till it covered the film counter and then back again to cock the shutter as is done with 120 film. The Rolleikin counter knob could then be depressed to move the counter on. Rewinding is undertaken by keeping the centre of the counter knob depressed whilst turning the lower knob to rewind the film into the cassette. I have not exposed a film to trial this option but it is a simple and inexpensive route to take if you have a TLR with suitable Rolleikin kit. This option does enable the full length of film in a 36 exposure cassette to give 23 or 24 frames 54mm wide whereas it would be necessary to have a 220 capability if considering a SL66 or 6000 series camera and to still use the camera’s film counter.
What about a Rolleiflex 6000 series camera?
Of course, using a cassette as the film feeder precludes using a Rolleiflex 6000 series camera with automatic film wind because it cannot run the film off at the end unless the film is not mechanically attached to the spool in the cassette. This would mean home-loading the cassette yourself, without using tape to fix it to the spool; this being similar to the spool-to-spool option offering the ability of cutting a suitable length of film from a 30-metre bulk roll. In this case, loading and unloading the magazine must be done in complete darkness in the darkroom or a changing bag (but not for loading if fed from the untaped cassette). Another option is to use a 120 roll film backing paper and attach the 35mm film in place of the 120 emulsion or similarly with a 220 paper leader and trailer. The problem here would be keeping the 35mm film centrally aligned on the spools. Further consideration could thus be given to narrowing the paper backing to 35mm and then using spools with suitable central spool width.
The further from the original ‘film in a cassette’ that one deviates, means that it is more involved to get the exposed emulsion back into a cassette if the ultimate aim is to have it commercially processed. Going too far down this path leaves the only option as home processing. This is probably not an issue for many who would only use black and white but colour negative/transparency film processing is not so temperature tolerant or so economical at home.
If a 6000 series camera is considered, it should be noted that it was only the original SLX backs that had both 120 and 220 capability however, these were not mid-roll changeable. The magazines for the 6006 and the backs for the 6002 were single film length only, which made using both 120 and 220 film expensive because each film required a different magazine. 220 backs/magazines are difficult to find now but they are a bit cheaper than the 120 equivalents. The SLX backs can be used on all 6000 cameras but there would be loss of film speed information when using 6003 and 6008 cameras.
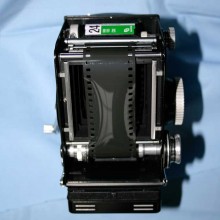
The SL66 film Magazine
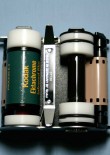
Loading the spool with 35mm film
35mm film and machined SL66 spool
Having given the options due consideration, I decided to experiment using my Rolleiflex SL66; the deciding factors being the interchangeable 120/220 film magazine and interchangeable lenses.
I machined two ‘cassette packers’ and two ‘spool fillers’ out of ‘Delrin’, an easily machined engineering plastic, similar to nylon. The ‘spool fillers’ I cut in half, axially through the centre line, to fit over the 120 spool centre section and held the two halves together with o-rings fitting into grooves in the circumference. This took me a couple of hours.
I eagerly assembled the bits and put a test film in place. I had read that Fuji film spools have a small peg in the paper locating slot to securely hold the film backing paper and that it was advisable to use one of these spools, using a hole punch to make a hole in the 35mm leader to catch on this peg. Fortunately I have some of these spools because I found that 35mm film does not stay attached unless the peg is used to hold it in place! This should be noted if considering using un-taped 35mm film spools.
35mm Film prepared for SL66 cassette
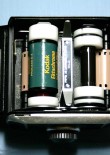
35mm Film in a SL66 cassette
I then found that the film edges were not lying flat enough against the pressure plate; I had to give this further thought...
I had not considered film flatness when opting to use my SL66. All the adaptations I have seen on the Internet have been for cameras with between-the-lens shutters and most images show the whole film width exposed including the sprocket holes. With the TLR and 6000 cameras (having between lens shutters) there is the ability to mask down the film gate (which is stepped to take proper Rollei masks) with suitably rigid packing to prevent the 35mm film edges curling towards the lens. With the SL66, having a focal plane shutter right against the rear of the camera, there is limited space and so the film gate is actually in the magazine as opposed to in the camera body with the 6000 cameras.
35mm Film in a SL66 cassette
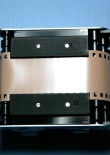
Cassette with 35mm guides
I machined two stepped aluminium plates and duly spray painted them black. I then screwed them to the pressure plate helping to hold the film edges flat against the plate. These plates were thin enough to allow the magazine dark slide to function normally, thus closing off the magazine so that it can still be removed from the camera at any time. This involved another couple of hours work and the only ‘damage’ to the magazine being four small 10BA threaded holes in the pressure plate.
A simpler alternative to these plates, would be to use a strip of credit card or similar, held in place with one or two thicknesses of double-sided sticky tape acting as packing on the outer long edge, allowing sufficient clearance on the inner edge for the film to pass through the channel thus formed between the plastic and the pressure plate. With these plates ‘permanently’ fixed in place, the film has to be fed into the channel before attaching it to the take-up spool. The downside of using these guides in a SL66 is that at the end of the film, it has to come back all the way through the channel as it is rewound. An option would be to have one of the guides hinged and lockable so that when released it allows the film to slide out sideways before being rewound; complications, complications!

35mm Film held in a SL66 cassette
I am sure that in my case, I will not be using this adaption that frequently for these quirks to become annoying.
Testing the setup
With the pre ‘E’ series SL66 magazines, the magazine and insert have matching numbers. This was because there was a film thickness feeler (similar to that in the ‘E’ and ‘F’ series TLR cameras) that detected the start of the emulsion and started the film counter. This feature was omitted from the later SL66 magazines due to the inconsistent tolerances of some film manufacturers leading to problems with unreliable film frame counting. I thought this feeler might pose a problem at the start of the film and the counter stopping at No.1. However, I found that if I just made sure the film was secure on the take-up spool, closed the back and pushed in the magazine film-wind button, the counter started immediately. I then wound the film crank on twice to advance the exposed portion of film leader. The counter then displays two frames more than the actual number of exposures taken. Once the magazine counter has recorded 24 frames, the magazine film-wind button pops out but I still could crank the film wind forward and back once more and make another exposure. If the film reaches the end whilst still cranking the wind-on lever, the camera becomes ‘locked-up’, such that the magazine slide cannot be inserted to remove the magazine and the crank cannot be returned to the ‘cocked’ position. The magazine back must then be opened in complete darkness, the film insert can then be removed and the camera crank turned to its normal position with everything reset. Hence it is advisable to remember when to stop taking exposures so that the slide can be inserted and the magazine removed.
The magazine to which I had fitted the film guides was one I had bought from Ebay and was slightly tatty. As I was testing the various stages of my adaption, I wound on the film by turning the small gear wheel using my thumb and I noticed it was getting very stiff to turn. I decided that it was probably the old lubricant gumming up the gear train and felt that it would put too much strain on the camera winding mechanism if I put that one on the camera (Brian, I will be sending it to you for some TLC...!).
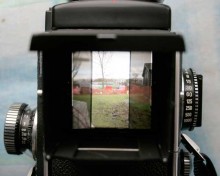
The Viewfinder mask
Masking the SL66 viewfinder
The final detail was to make a suitable viewfinder mask. I had read that to have a translucent mask enabled the detail surrounding the image area to be viewed, enabling quicker assessment of important subject matter that could be included. The mask should also be rigid enough to stay in place. I thought that a piece of laminating/encapsulation pouch heat bonded together with no paper inside would be ideal (I have some surplus if anyone would like some). I cut a piece and formed it to the shape of a Rollei SL66 mask fitting on top of the viewfinder screen and held in place by the hood/prism.
I swapped the modified insert to my other magazine (ignoring the fact that for earlier versions the inserts should be numerically matched to the magazine) and with transparency film loaded, set off to take some shots. The first thing I noticed was how easy it was to accidentally trip the very light shutter release when flipping the camera on its side! I wasted three exposures on the roll because I had forgotten to keep the release locked in between exposures.
All photos were taken using a 50mm f4 Distagon. You will notice some shading to the sides of the daytime photos. When I first saw this, I thought there was possibly a problem with my design. I soon remembered that only having the 80/250mm lens hood in my kit bag (forgetting to pack the 50/60mm hood), that the effect is vignetting from using the wrong one. This is not evident in the night time shots because I did not use a lens hood.
Conclusion
Was it worth the time and effort? I am certain of that. I do not know how often I will use my adaption but I found it interesting to go out in search of subjects to fit a different format. It is easier to cut down a 6x6 or 4.5x6 frame to the same size but it is a waste of film to do it often. I also prefer looking for a subject that will fit the frame rather than taking a photograph and afterwards thinking, “If I chop the top and bottom off, I can improve the composition”.
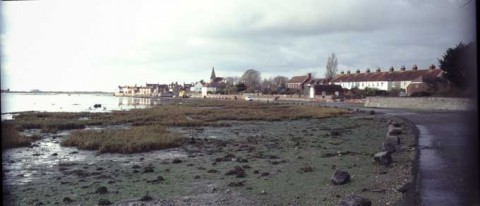
Trippet near Bosham
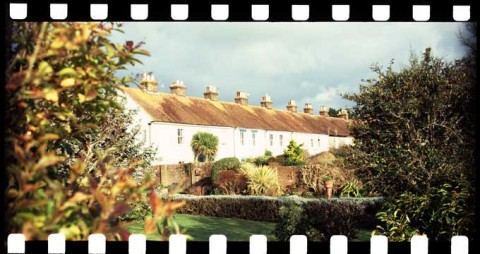
Trippet Chimneys in Bosham
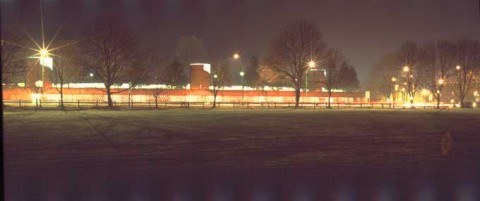
Westgate Carpark Chichester
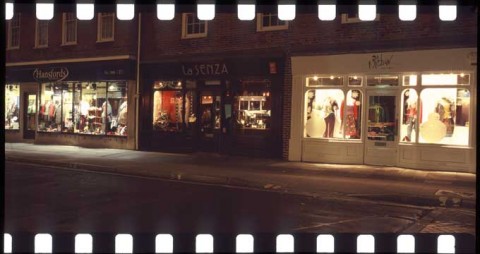
La-Sensa in Chichester
GePe slide mounts for this format are available from the Widescreen Centre for £15.99 Art.: 2603 - 22 x 54 mm, one Anti-Newton Glass, 3mm, 20pcs/box.
Having other interchangeable lenses for my SL66 I will have many opportunities to experiment with panoramic shots.