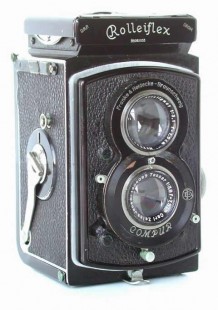
I know that a couple of members have recently acquired ‘Baby’ Rolleiflexes and with the Meeting looming in the not too distant future, my mind turned to dusting off my ‘Baby’ and producing some 4x4 transparencies for the slide show. I did some research on the internet and found that although colour transparency 127 film had been re-introduced by Maco, it has since been discontinued again. Maco still produce Macocolor UCN 200 colour negative film in 127. They also stock Efke 100 and Rollei Agfa RETRO 80S 127 B&W film which would probably be available from other suppliers too. Bluefire Murano 160ASA 127 size daylight balance colour print film is available from frugal photographer. They comment, with respect to the now discontinued Macochrome colour reversal film: “We expect to have a replacement product available some day, but God only knows when”.
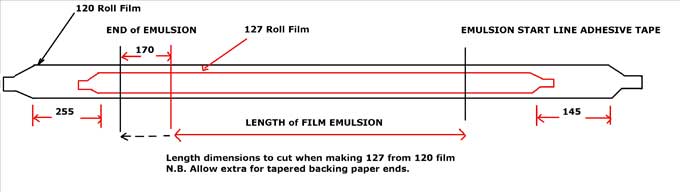
I gave some thought to Manfred Borgis’ article in Issue 7 and how to cut-down 120 roll film. Although this appears simple on paper, three things niggle in my mind.
- Firstly how to cut the film to size without scratching the emulsion; the film should also be slightly narrower than the paper backing to ensure a light tight seal between the spool and the paper roll. This is not too much of a problem if the film is kept in the dark and loaded in virtual darkness.
- Secondly, how much to cut off the length of the leader and trailer paper and how much to cut off the film emulsion.
- Thirdly, because the film is taped to the leader, when it is wound through the cutter system, the untapped trailer would be first back onto the roll when rewound and thus would need taping to the paper backing so it is correctly wound onto the spool again.
I have found that when running 120 film through a camera as a test and then re-winding it (in daylight), it is almost impossible to correctly position the film with the backing paper so that when the film is wound back onto the spool, the taped film portion does not cause a ‘bump’ where the emulsion and backing have ‘slipped’. The only way to correct this is to peel off the sticky tape and re-position it on the paper and carry on rolling. A quick flash of inspiration! Could I just trim 120 emulsion and attach it to 127 backing paper?
Having ‘rolled-my-own’ 16mm film for my Rollei 16, I know how easy it is to scratch the emulsion, although with such a small negative, the damage is much more noticeable.
I know that people have and do cut down 120 roll film to 127 and Manfred’s photographs show clearly that it is worth the effort, so my concerns can’t be that much of a problem; but I do worry...!
My ‘idle’ mind wandered through these issues and I was thinking about a suitable cutter; whether to make a cutter like Manfred uses; to adapt a cheap 120 camera along the lines of the one that appears appended to Manfred’s article or whether a Rolleiflex plate back adapter could be non-destructively adapted to do the job ‘in style’.
My first task was to get a roll of 127 film, measure it, compare it to a 120 roll and then evaluate exactly how much needs to be cut off and from where.
I had purchased some Efke R21 127 B&W 100 ASA film years ago (dated April 95) and some Kodacolour 200 ASA 127 film (dated June 93) as soon as Kodak announced its withdrawal. These have been kept in the fridge.
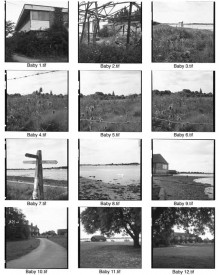
Getting 127 film developed is not easy unless you do-it-yourself and of course you may want to keep the spools for re-use. The logical choice was to use the B&W film, because it’s easily replaced at present and I have B&W (and colour too) developing equipment. So, I ran a film through my ‘Baby’ during a walk around Bosham.
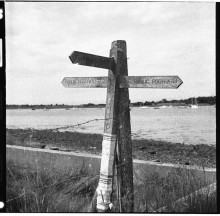
National Trust Sign on Bosham Creek with 127 Film
I have not used my darkroom equipment since it was moved 8 years ago. I have some Agfa Rodinol which was opened in November 1999 (I date my chemicals when I open the bottle) and I have read that Rodinol does not deteriorate with time. I would be able to put this to the test – nothing ventured, nothing gained. I pulled out my changing bag and loaded the film into the tank; 127 film, being narrower than 120, is less likely to kink and it aligns with the reel quite well. Also, being shorter, it is much easier in a changing bag. I pulled out all my chemicals and equipment and I noticed that the column of alcohol in the thermometer had separated. “Confound it!” There was only one thing to do, dip it into near boiling water and watch the lower column run up towards the upper column. This got a bit ‘hair-raising’ because the upper column was pushed right up to the top with a gap still in the middle! “Easy does it!” By just easing the bulb up and down in the hot water, I coaxed the lower column up until it joined with the upper section and quickly snatched the thermometer from the water. ‘Bingo’ it had worked! One complete column of alcohol again and a working thermometer. The thermometer had been stored horizontally for eight years, so I guess that this was the cause. I will now keep it vertical.
I had to find the development times for the Efke R21 from the internet, the instructions with the Rodinol did not specify the information. I found the details at digital truth which rated the film the same as Efke 100. The times from the internet, again on the Digital Truth site, gave details for 50:1 and 100:1 dilution. I decided on 100:1 for 16 minutes @ 20° C. Due to the age of the film I worked at 70° F (21.2° C) which gives about a 10% increase in development to compensate for this fact. I cleared a space in the bathroom and went through the process. Although it has been at least 10 years since I had done any developing, it all came back quite naturally. Once dry, the negative strip looked tiny compared to 120 film, really quite manageable. The film had plenty of detail and I was pleased. When I scanned the negatives, they were quite ‘flat’, lacking contrast, a little adjustment in Photoshop can soon improve that. There is a small amount of fogging on the edges of some frames too. On a number of frames it looked as if the film had reticulated (caused by rapid change in temperature) which was not the case because even the rinse water had been maintained at exactly 70° F and anyway, this emulsion damage was random. It shows up in the highlight areas of the print, e.g. the sky. I think, because the film was just wrapped in foil, that with changes in fridge temperature, dampness/condensation may have been the cause. It is not really a problem because this was just a test, firstly to see that the camera worked and secondly that the Rodinol was still active as was my fixer and stop bath. I also now had a used 127 film to take comparative measurements from (see below).
Cutting down 120 film to 127
In the meantime, whilst quietly inverting the developing tank once a minute, I had ‘chewed over’ the cutting down 120 to 127 task and had added the wasted length of film into the equation, I have concluded that, other than actually being able to take 4x4 transparencies with a ‘Baby’, it would be more economical and easier to use a 4.5x6 adapter in a Rolleicord, Rolleiflex ‘T’ or Rolleimagic, and get 16 frames on the 120 roll commercially developed for a few pounds. Then, is all you have to do is to trim the transparency to size and mount it in a 4x4 slide mount. Of course, if you really insist on ‘roll-your-own’ 127 transparencies (unless you are happy to develop the E6 127 film yourself), certainly in the UK, it is not easy to find a processor who still has the ability to develop sizes other than 35mm and 120 at a ‘sensible’ price – and then you still have to make sure you get the spool back again for re-use.
Developing colour film (negative or reversal) is as easy as developing B&W only it takes longer. The main differences are that the temperatures must be accurately maintained (ideally use a temperature controlled bath) and the number of steps is greater. The cost of the processing kits is quite high and they do not keep for more than a few weeks once opened. It pays to expose the correct number of films for the kit and then process them in one go or over a few days. The home developing cost per 120 or 35mm colour film is not a lot different to commercial processing, so economy with these film sizes is not a reason to consider it.
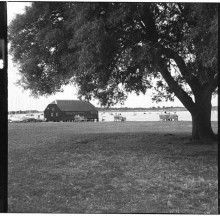
Bosham Boat Shed with Baby Rolleiflex - 127 film
If a few members would like to purchase 127 colour print film from Maco or Frugal Photographer, then it would probably be worth placing a ‘multiple’ order to reduce pro rata carriage costs. If this is of interest, please contact me and I can look into it further. Black and white film, being available in the UK, is not such an issue but if added to a colour order could bring savings too. The only proviso is that payment would have to be ‘up front’.
I will continue my ponderings in due course and get back to you...
Some useful links:
http://www.onetwoseven.org.uk/- offers tips and has even used 35mm film in a Yashica 44.
http://www.photofilmprocessing.co.uk/110filmprocessing.html - offers 127 processing & printing @ £9.
http://www.jcbimaging.com/126_developing.htm @ £25 per film (!).